It took me some time to grasp the idea about how to use npm and bower in Visual Studio node.js projects, given the fact that Nuget is such a great package manager for this environment. From an ASP.net perspective it would be preferable to use just a single tool for package management and load javascript libraries the same way we load .Net libraries. After all this is how you do it in the asp.net context – loading bootstrap, jquery etc via Nuget or using a preconfigured project template with all required javascript libraries, css files and so on.
Now that I am starting to explore a more native javascript development style with node.js on the server side this doesn’t seem to make sense any more – because there is no way to mirror the entire javascript and node.js ecosystem as nuget packages. Actually this would be nonsensical since there are two great package managers available: npm – the node package manager, and bower.
Javascript package managers – OMG, why two of them?
First I tried to find out if I could replace npm entirely by bower. What I’ve learned then in a nutshell: bower is not a replacement for npm.
![]() Npm is the base – making available the node.js package registry with its plethora of libraries, resources and assets for javascript developer. Npm was created to manage the server side – more or less pure node.js packages.
Npm is the base – making available the node.js package registry with its plethora of libraries, resources and assets for javascript developer. Npm was created to manage the server side – more or less pure node.js packages.
 Bower builds on the npm registry but then rolls it’s own. It’s intention is to ease dependency management of packages on the frontend – jquery, angular, bootstrap, kendo, backbone etc.
Of course you could install all packages with npm. But bower adds sugar – it doesn’t install everything in the ‘node-modules‘ – hierarchy, but maintains packages as ‘components’ in a flat folder named ‘bower_components‘. The notion is somewhat different. As you can read on the bower website: Bower is optimized for the front-end. Bower uses a flat dependency tree, requiring only one version for each package, reducing page load to a minimum.
Visual Studio integration
My environment is
- Visual Studio 2013 Pro
- Node.js (currently 0.10.26)
- Node.js tools for Visual Studio (currently 1.0 RC)
To create a new node.js project I choose File > New > Project > Installed Templates > Javascript > Node.js > Blank Azure Node.js Web App.
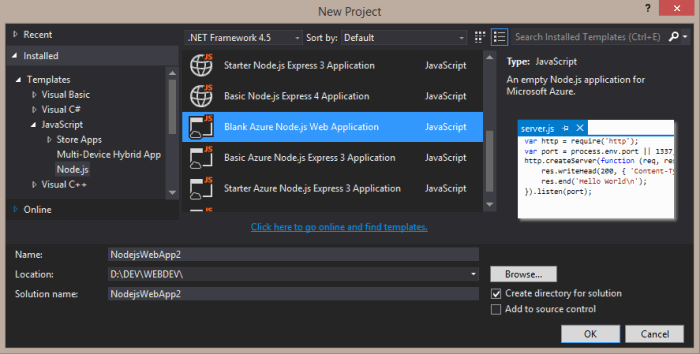
This opens a almost empty solution. On the node.js side the project contains
- a skeleton project.json, which is the npm package manifest,
- a Solution Explorer tree node named npm containing only global modules installed previously
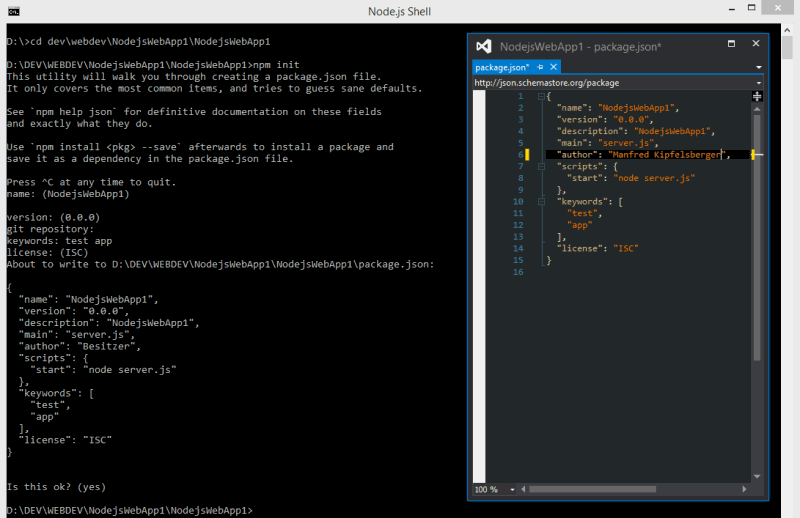
First, we have to initialize npm locally for the project with npm init. You may use the Node.js command line (which is part of NTVS) or the Package Manager Console in VS (which essentially is a Powershell window and able to execute any shell commands).
When using the command line, first cd into the project folder where project.json lives, then issue npm init and fill in the fields. This fills the manifest with some basic information, as shown below. You might directly edit the package.json as well.
Now, let’s install some packages required for development: grunt and bower.
Grunt is basically a task runner used to automate tasks during the dev workflow as well as in the final building of a project.
Install grunt and some grunt tasks with
|
1 2 3 4 5 |
$ npm install grunt --save-dev $ npm install grunt-contrib-watch --save-dev $ npm install grunt-contrib-uglify --save-dev $ npm install grunt-contrib-csslint --save-dev $ npm install grunt-contrib-jshint --save-dev |
It is fine to do it in the shell if you are used to it. For some it may be more convenient to use the npm packager dialog via the context menu on the npm-node in Solution Explorer. When you open the dialog it can take a while to load the package list (~ 70mb).
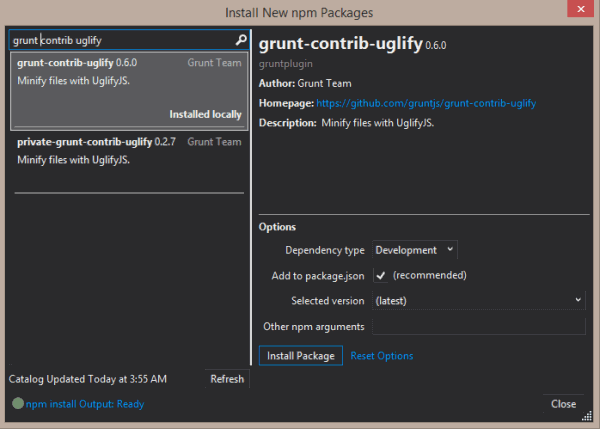
Personally, I prefer the command line. Be careful with using the search field in the dialog: entering an a package name literally (like ‘grunt-contrib-uglify) will yield a very long and unsorted list. Omit the hyphens. Don’t press Enter, because it will load the first package marked.
If you don’t check ‘Add to package.json’ you have to add an entry manually later. If you only need the file for development select ‘Development’ as Dependency type. This will put the package under dev-dependencies in the manifest (‘Development’ as dependency type corresponds to the –save-dev – switch in the cli and essentially means that these packages will not be deployed with the solution, because they are required for development but not for running the application).
Now we install Express as web framework via npm. Since express will be required in a deployed solution, save it to dependencies in package.json:
|
1 |
npm install express --save |
At last, we install bower with:
|
1 |
$ npm install bower -g |
This only installs bower as npm module. Bower commands are intentionally similar to npm commands. Bower works with a file named bower.json where it stores package configuration and which is sort of counterpart to npms package.json. So the first step is to initialize bower, and the command is, yep: bower init. Answer the questions on the cli, e.g.
|
1 2 3 4 5 6 7 8 9 10 11 12 13 14 15 16 17 18 19 20 21 22 23 24 25 26 27 28 29 30 31 32 33 34 35 36 37 |
D:\DEV\WEBDEV\NodejsWebApp1\NodejsWebApp1>bower init ? name: NodejsWebApp1 ? version: 0.0.0 ? description: Test project for trying out package management ? main file: ? what types of modules does this package expose?: ? keywords: test ? authors: ######## <##@#######.##> ? license: MIT ? homepage: http://www.manfredkipfelsberger.de ? set currently installed components as dependencies?: Yes ? add commonly ignored files to ignore list?: Yes ? would you like to mark this package as private which prevents it from being accidentally published to the registry?: Yes { name: 'NodejsWebApp1', version: '0.0.0', authors: [ '######## <##@#######.##>' ], description: 'Test project for trying out package management', keywords: [ 'test' ], license: 'MIT', homepage: 'http://www.manfredkipfelsberger.de', private: true, ignore: [ '**/.*', 'node_modules', 'bower_components', 'test', 'tests' ] } ? Looks good?: Yes |
Replace with your author and website information.
Now let’s install common frontend-packages with bower: jquery, bootstrap and angularjs.
|
1 2 3 4 5 |
bower install bootstrap --save bower install bootstrap --save bower install angular --save |
After that, bower.json will look something like:
|
1 2 3 4 5 6 7 8 9 10 11 12 13 14 15 16 17 18 19 20 21 22 23 24 25 26 |
{ "name": "NodejsWebApp1", "version": "0.0.0", "authors": [ "######## <##@#######.##>" ], "description": "Test project for trying out package management", "keywords": [ "test" ], "license": "MIT", "homepage": "http://www.manfredkipfelsberger.de", "private": true, "ignore": [ "**/.*", "node_modules", "bower_components", "test", "tests" ], "dependencies": { "jquery": "~2.1.1", "bootstrap": "~3.3.1", "angularjs": "~1.3.5" } } |
Other Visual Studio options for bower
There are only two options related to bower available in Solution Explorer:
- when you right-click on bower-components you may update all components
- to update a single package you right-click on a package in Solution Explorer and select Bower: Update this package in the context menu
This comes handy, when you load a project from github and have to update the packages. Unfortunately, that’s all there is. There’s no package manager dialog for bower in Visual Studio. You cannot install new packages interactively. You still need the command line (which comes with NTVS) to install packages.
Also, do not try to delete a package in bower_components with Solution Explorers context menu > delete. It will remove the package from the folder, but will not remove the package entry from bower.json. So just use bower uninstall<package name> --save for that.
To learn more, see:
- Scott Hanselmans post Introducing gulp, grunt, bower and npm support for Visual Studio
- the bower website
- the npm registry